



![What Is a DST File? How to Open and Use It [2026 Guide]](https://dynamicmockups.com/wp-content/uploads/2026/08/what-is-a-dst-file-cover-768x403.png) Embroidery
Embroidery
On this page
How to Start Offering Embroidery in Your Print Shop
You keep getting the same request: a customer wants their logo on a cap or a stack of left-chest polos, and your shop only prints.
Here is how to start offering embroidery without buying a machine first: add it as a made-to-order service, quote each job from its stitch count, proof the logo digitally before you touch a blank, run small batches in-house or through a partner, and keep the machine file so every reorder is one click.
That is the whole model. Sell it before you sew it.
Here is a roadmap you can act on this week:
- Say yes: list embroidery as a made-to-order option next to your printed goods.
- Preview the logo: upload the customer’s artwork and generate a stitched preview to read an estimated stitch count.
- Quote fast: price the job from that stitch count with your margin already built in.
- Proof it: put the design on a mockup of the exact garment and send it before you commit a blank.
- Fulfill it: sew the run yourself or hand the file to a contract embroiderer.
- Save the file: keep the machine file so the reorder takes seconds, not another setup fee.
You do not need a $10,000 machine on day one to offer embroidery services. You can preview, quote, and close the sale before a single stitch goes into fabric, then decide how to produce it.
This guide is for shops that already print and keep turning embroidery inquiries away. If you are launching from zero instead, our guide to starting a print shop from scratch covers that ground. If you are building from the ground up instead, our full print-on-demand embroidery guide covers artwork, DST files, and suppliers.
Adding embroidery to your business is a different move. You already have customers, equipment, and a storefront, so you are adding a line, not a company.
And because you already show printed work, the visual half of embroidery uses a workflow you mostly know already.
Why Small Embroidery Orders Are Worth Saying Yes To
Small embroidery orders have a reputation for being unprofitable. The reason is the setup fee.
Before a machine can sew a logo, someone has to digitize it into a stitch file. Bureaus commonly charge $10 to $45 to digitize a single logo, and complex art climbs higher.
On a 100-shirt job, that fee disappears into the order. On a 6-cap job, it eats your margin or scares the customer off. So most print shops just say no.
That no is the opportunity. Every inquiry you forward to a competitor is a customer learning to buy embroidery somewhere else, so keep them in your shop.
Run the math on a small job. A customer wants 8 caps with a left-chest logo.
Digitize the logo once. After that, the thread and machine time to stitch each cap is a small, fixed cost that you charge for by the stitch. Add the blank, price the finished cap at your branded-merch rate, and the margin holds across all eight pieces.
The job only ever looked unprofitable because a bureau’s one-time setup fee was sitting on top of a tiny order. Own the file, skip the fee, and the small run pays.
Once you can say yes, caps, left-chest logos, tote bags, and beanies turn into high-margin work. These are exactly the jobs bureaus make painful and competitors keep declining.
Embroidery also reads as premium. Thread has weight and texture that a flat print does not, so customers accept a higher price for an embroidered logo than for the printed equivalent.
Some products practically ask for stitching. Structured caps, polos, beanies, canvas totes, and workwear jackets all wear a stitched logo better than a print, and buyers expect to pay for it. Hoodies belong on that list too, and our embroidered hoodie mockup guide shows how to proof one before you stitch.
Then there is the part that makes embroidery for print shops so sticky: reorders. A company logo rarely changes from one season to the next, so the same customer comes back for more polos, more caps, more staff shirts, all from a file you already own.
Say yes once and you have often earned a repeat account.
Quote Every Embroidery Job From Its Stitch Count
Printing is priced by ink colors and coverage. Embroidery ignores both. It is priced by stitch count, because stitches are what use up thread, machine time, and your day.
The industry standard is a rate per 1,000 stitches. Thread Logic describes it plainly: at $1 per thousand stitches, a 10,000-stitch logo costs about $10 to sew. Rates move with volume, and small runs sit at the top of the range:
| Order type | Typical rate per 1,000 stitches |
|---|---|
| Low volume / custom | $2.00 to $4.00 |
| Bulk / contract | $0.50 to $1.50 |
Those figures come from a shop-side embroidery cost per 1,000 stitches guide, which also notes that orders under 12 pieces usually carry a minimum plus a higher per-stitch rate to cover hooping and thread changes.
What runs the count up is size and fill. A solid square inch of embroidery is roughly 2,000 stitches, so a large back logo costs far more to sew than a small left-chest mark. Specialty work like 3D puff runs the density and the price up further.
So the whole quote hangs on one number: how many stitches. Get that fast and you can price on the spot.
The old way was to eyeball a logo and guess. You get burned when the real file comes back at double the stitches you quoted.
That is where a digital preview earns its keep. Upload the logo, see it rendered as stitches, and you have an estimated stitch count to quote from before the customer hangs up.
Quote it while they are still on the phone. Speed wins the job more often than the last few cents of price.
This is also where embroidery stitch count pricing meets your bottom line. Pick a per-1,000 rate, add your minimum, and build in margin the same way you would price your products for profit on the printed side of the shop. For the full method, our guide on how to price embroidery by stitch count walks through the formula and two worked quotes.
Proof the Logo Before You Commit a Garment
A bad sew-out is expensive twice. You lose the blank you ruined, and you lose the customer’s trust when the logo comes out lumpy or off-center.
The fix is to proof the logo digitally before you commit a garment to the hoop.
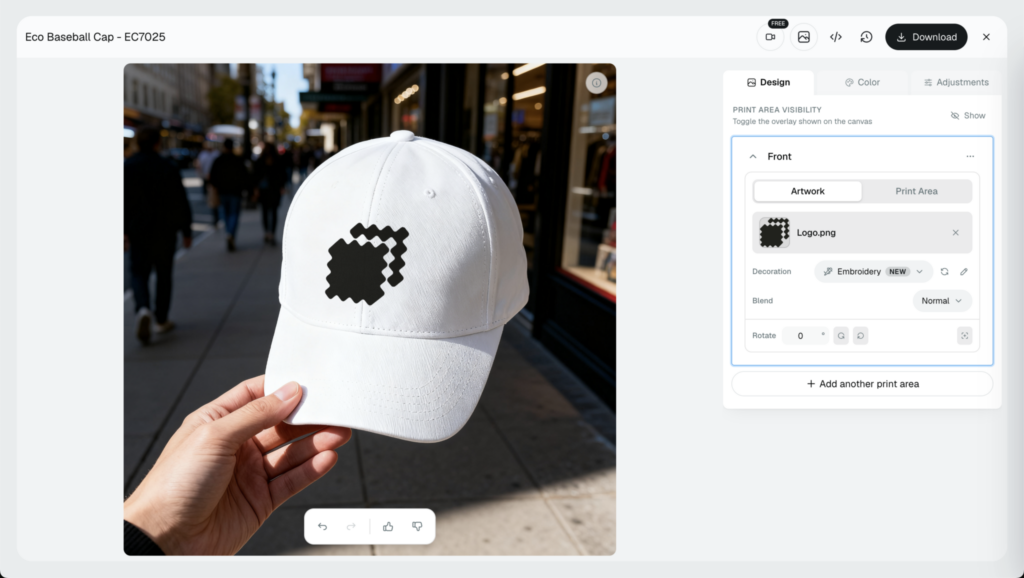
Here is the workflow in Dynamic Mockups: Use the Embroidery decoration method: upload the customer’s PNG logo, preview how it will actually stitch, and place it on a mockup of the exact garment they asked for, the specific cap, polo, or beanie, in the color they want. You can send them to see how it would look, and you get all the necessary details about the stitches thanks to Stitch AI.
Now the proof looks like their actual order instead of a generic template.
Pair that render with a real sewn example of similar work so the customer trusts what they are seeing. A preview shows placement and scale; a photo of past stitching shows texture and quality. Together they close the sale.
On larger runs, a physical test sew-out is still worth doing before you commit the full batch. Digital proofing gets you the approval; the test sew-out protects the volume.
A signed-off proof also covers you later. When the customer approves the exact placement and color on screen, you have a record to point back to if they change their mind after the run.
💡 Pro tip: The Embroidery decoration method previews the stitched logo and drops it onto the garment in the same tab, so you approve the look before you buy blanks. If you want to see how different tools handle this, we compare the best embroidery mockup generators side by side.
Keep the Machine File and Reuse It for Every Reorder
Getting a clean stitch file used to mean hiring a digitizer or learning the craft yourself. It no longer has to.
You refine the design in the embroidery studio editor using Dynamic Mockups, where the Stitch AI agent handles the digitizing decisions like a real professional digitizer, so you do not need to be a trained digitizer to get a production-ready file.
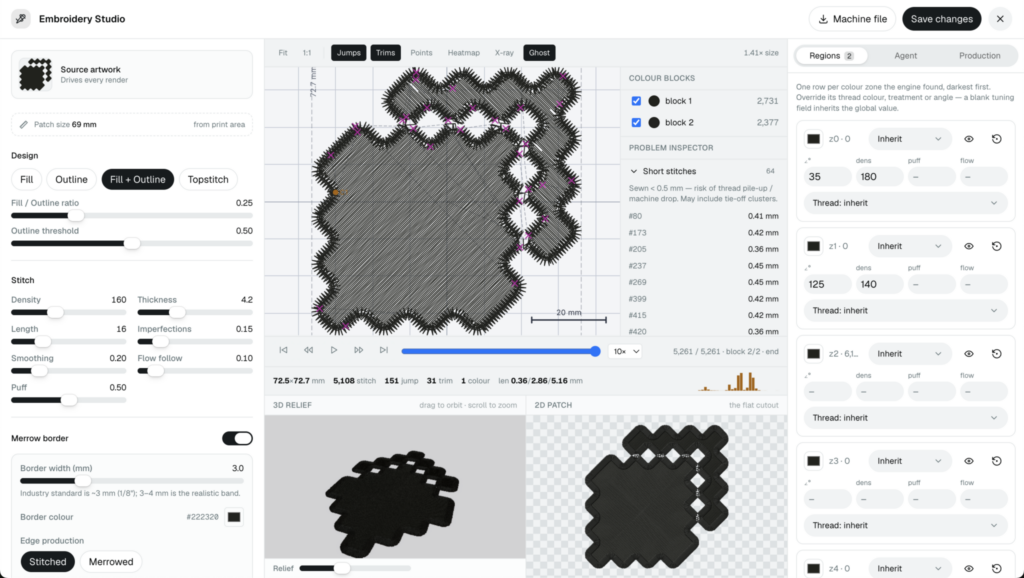
Then you export a Tajima DST file and keep it. DST has been the standard commercial embroidery format for decades and runs on nearly every machine, so the file is portable across almost any brand of equipment, including Barudan, Happy, and ZSK, not just Tajima.
Owning that file changes the math. When you pay a bureau to digitize, they often keep the master. When you export your own DST, you hold it, reuse it, and never pay a setup fee for that logo again.
This is what turns small jobs into easy money. A size variant or a five-cap reorder was never worth emailing a bureau and waiting on a quote. With the file in hand, it is a one-click reorder you sew and ship the same day.
Production is the last decision, and you have two options:
- Outsource the sew-out: send your DST to a contract embroiderer and stay asset-light while volume is low.
- Bring a machine in-house: buy hardware once the recurring orders justify it, and keep more of the margin.
Outsourcing early keeps your risk near zero. You quote and proof in-house, a contract shop sews from the DST you send, and you never gamble on equipment you have not grown into yet.
How do you know when to buy? Watch the reorders. When the same logos come back often enough that outsourcing fees and turnaround start to pinch, a single-head machine tends to pay for itself.
Either way you own the file, so you can move the work in-house later without redoing a thing. That is a low-risk way to start an embroidery business inside the shop you already run, and to sell embroidered products the same week you decide to.
How Dynamic Mockups Helps You Add Embroidery
The whole workflow lives in one tab, using Dynamic Mockups. Upload the logo, let our Stitch AI agent do the digitizing, see the preview on the mockup, refine it in the advanced editor if needed, then export the Tajima DST you keep.
Preview, quote, proof, produce, reorder. No Photoshop, no bureau, no waiting on someone else’s queue.
You do not have to master digitizing to start. You need to preview a logo, quote it, and hand off a clean file, and that is a workflow any print shop can run.
Run your first customer logo free and see the stitched preview and the DST export for yourself. Check the free plan and paid tiers when you are ready to scale the volume, no credit card required to start.
Say yes to the next embroidery request instead of forwarding it away.
Showcase your E-commerce products like big brands, without costing a fortune. Sign up today. No credit card required.
Frequently Asked Questions
Do I need an embroidery machine to start offering embroidery?
No. You can list embroidery as a made-to-order service, preview and quote the logo digitally, and close the sale before you own any hardware. Send the machine file to a contract embroiderer to sew the run, and stay asset-light while volume is low. Buy a machine later, once repeat orders justify it. Sell it before you sew it.
How much does it cost to add embroidery to a print shop?
The main upfront cost is digitizing, where bureaus commonly charge $10 to $45 per logo, with complex art higher. If you outsource the sew-out to a contract embroiderer, you skip buying hardware entirely. Bring a single-head machine in-house only when recurring orders justify the spend. Start asset-light, own your files, and let the reorders tell you when to invest.
How do you price an embroidery job?
Embroidery is priced by stitch count rather than ink colors. Pick a rate per 1,000 stitches, add a small-order minimum, and build in your margin. Low-volume custom work runs roughly $2 to $4 per thousand stitches; bulk contract work sits at $0.50 to $1.50. Read the count from a digital preview so you can quote fast, often while the customer is still on the phone.
What file format do embroidery machines use?
Most use the Tajima DST file. It has been the standard commercial embroidery format for decades and runs on nearly every machine, so it is portable across almost any brand of equipment, including Barudan, Happy, and ZSK, not just Tajima. Export your own DST and keep it, and every reorder of that logo becomes a one-click job with no setup fee.
Can I offer embroidery services without knowing how to digitize?
Yes. You refine the design in an advanced online editor where a Stitch AI agent handles the digitizing decisions, so you do not need to be a trained digitizer to get a production-ready file. Upload the logo, preview how it stitches, and export a clean DST. All you really need is to preview a logo, quote it, and hand off a good file.
![How to Price Embroidery by Stitch Count [2026 Formula + Chart]](https://dynamicmockups.com/wp-content/uploads/2026/10/how-to-price-embroidery-by-stitch-count-cover-768x403.png)