If you’re using Dynamic Mockups to showcase your designs, you need to ensure your PSD files are formatted correctly.
In this guide, we’ll break down everything you need to know about preparing and uploading your Photoshop mockups to Dynamic Mockups.
This is especially important if you’re using the Mockup Generator API, which relies on correctly formatted files to produce accurate, high-quality mockups.
Let’s dive in!
Also, we recorded this video to make it easier for you.
Why PSD Formatting Matters?
Before we get into the nitty-gritty, let’s talk about why proper PSD formatting is crucial.
Dynamic Mockups relies on high-quality PSD files to generate realistic mockups.
If your PSD isn’t formatted correctly, you could run into issues like:
- distorted images
- incorrect layers
- failed uploads.
By following the steps below, you’ll ensure your mockups look professional every time.
Benefits of Using PSD Files with Dynamic Mockups
Using Photoshop PSD files with Dynamic Mockups can really make a difference in your mockup creation process. Here’s how:
✨ Customization Freedom – With PSD files, you have full control over your mockups. You can create and edit layers to match your exact style, ensuring your mockups are unique and tailored to your brand.
✨ Build Brand Consistency – PSD templates help you maintain a consistent and professional look across all your mockups. This consistency is crucial for building a recognizable and trustworthy brand.
✨ Realistic and High-Quality – PSD files offer high-resolution and detailed mockups, ensuring your designs look polished and professional. This quality is essential for making a great impression.
✨ Save Time – Dynamic Mockups automates the process of creating multiple mockup variants from a single PSD template. This saves you a lot of time and effort, allowing you to focus on creativity rather than repetitive tasks.
Using PSD files with Dynamic Mockups not only enhances the quality of your mockups but also makes you quicker.
This powerful combination helps you create professional, unique mockups quickly and easily.
Step-by-Step PSD Formatting Guide
1. Start with the Right Dimensions
First things first, make sure your PSD file has the correct dimensions.
The online version of the mockups is meant to be fast, so we recommend staying around 1500x1500px and 72dpi.

The smaller your PSD resolution is, the faster your mockup will load online.
📌 Note
This is most important if you’re going to use your own mockups through the API.
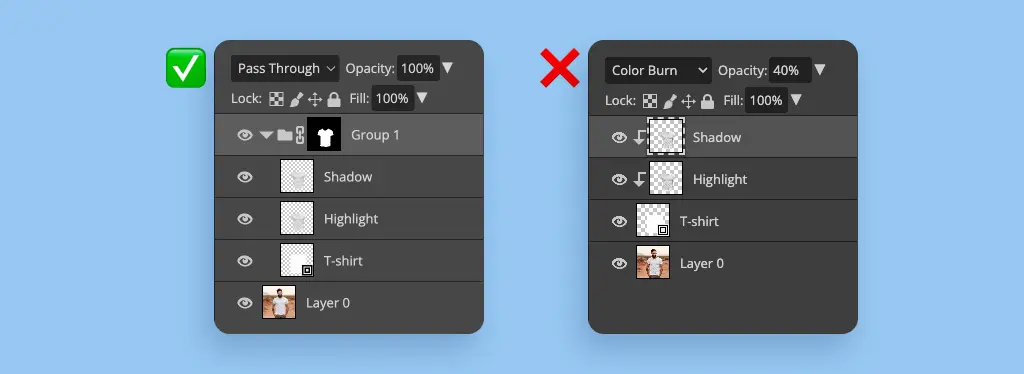
2. Organize Your Layers
Layer organization is key. Dynamic Mockups needs to easily identify which layers to manipulate.
Name your layers logically (e.g. “Background, T-shirt, Artwork”) and group them if necessary.
Dynamic Mockups displays the names of smart objects so avoid default naming (e.g. “Layer 1” or “Copy of Layer 1”).
Use Layer Masks instead of Clipping Layers and keep it simple – don’t use nested layer masks!
3. Setup Smart Objects
Smart Objects serve as placeholders for your designs and they are the layers which will be displayed in the Dynamic Mockups app.
Besides adding designs, Smart Objects are used for adding background colors.
Make sure that Smart Objects don’t have unnecessary big size and dpi which will speed up processing.
Inside smart object layers, there shouldn’t be anything else, except the example placeholder image. We advise to add a color fill layer inside.
If you duplicate a smart object in Photoshop, and make many copies of it, they will all get updated when you replace the content in one copy.
📌 Note
Please make sure only the placeholder layers are smart objects, and all other layers are rasterized.
No Smart filters or layer styles – these will be ignored.
4. Optimize File Size
Make sure the “Delete Cropped Pixels” is ticked to crop off any content that is not visible. This way the PSD file will be smaller and work faster.

5. Uploading Your PSD to Dynamic Mockups
Once your PSD is perfectly formatted, it’s time to upload it to Dynamic Mockups. Here’s a quick overview of the upload process:
- Log in to Dynamic Mockups
- Navigate to My Templates page
- Upload Your PSD file
- Open the Template and add your designs and color options
- Download your mockups or sync to your e-commerce shop
Final Thoughts
While formatting your PSD mockups for Dynamic Mockups might require a few extra steps, the results are definitely worth it!
Once uploaded, your PSD will be converted into an online mockup, making it incredibly easy to customize and download without needing Photoshop. If you’re looking for an easier way to create and modify mockups, try our custom Photoshop mockup tool for seamless editing and customization.
Just add your designs and color options into the Dynamic Mockups Editor, and you’re good to go.
Start creating for Free!
Showcase your E-commerce products like big brands, without costing a fortune
💡 ProTip
You can tap into the existing library of mockups on Dynamic Mockups via the API, allowing you to automate the whole process.
🔥 We continually update this guide with new information, so thank you for your feedback and keep it coming!