How many of your artworks are sitting unseen in a sketchbook or tucked away on a hard drive? Why keep them hidden when they could be hanging on someone’s wall, printed on a t-shirt, or even becoming a best-selling print online?
Your creativity deserves to be seen and admired, and it has never been easier to share it with the world.
In this article, you will learn how to make prints of your art and sell them online! Let’s get started!
Start creating for Free!
Showcase your E-commerce products like big brands, without costing a fortune
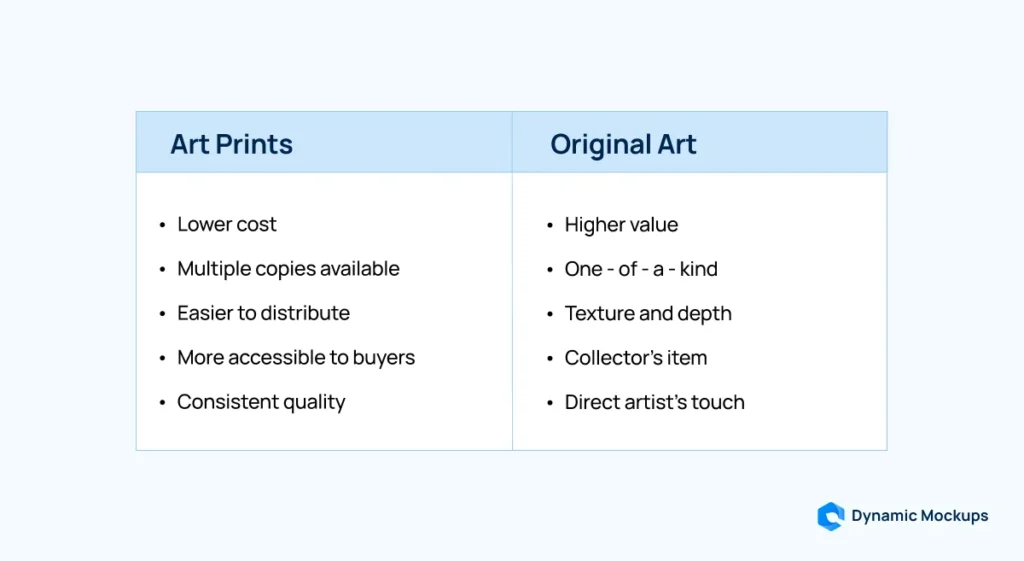
Why Create Art Prints in Addition to Selling Originals?
Original pieces are typically one-of-a-kind treasures that can fetch impressive sums, but they’re also limited by their very nature.
In contrast, art prints make it easier for more people to enjoy and own artwork.
They help bring your vision as an artist to a wider audience, making art more inclusive and reinforcing the idea that creativity should be shared with everyone.
Here are three key reasons to create prints of your artwork:
- Broader accessibility – Not everyone can afford original artwork, but high-quality prints allow fans to own, appreciate, and connect with your work at a more affordable price.
- Greater scalability – Instead of relying on a single sale, you can produce multiple copies and reach fans worldwide. To maintain exclusivity, you can even create limited-edition prints, keeping a sense of rarity while expanding availability.
- Steady income stream – Making a living as an artist isn’t always easy, but offering prints can help create consistent revenue. Combining it with reliable print-on-demand service makes it a hassle-free way to earn from your art.
How to Make Prints of Your Art in 6 Easy Steps?
Step 1: Digitize Your Artwork
The first step to creating prints is turning your artwork into a high-quality digital file.
The goal is to capture every detail, from textures to color accuracy, so your prints stay true to the original.
There are two main ways to do this:
- Scanning – Great for smaller pieces and ensures precise details.
- Photography – Ideal for larger or textured artwork where scanning isn’t an option.
Each method has its benefits, and choosing the right one depends on the size and nature of your artwork.
Scanning Your Artwork
Scanning is often the preferred option for smaller, flat artwork.
Most consumer-level scanners handle up to standard legal or A4 paper sizes, but professional scanning services can accommodate larger pieces.
When done properly, scanning ensures an extremely high level of detail.
Here is how you can do it in 6 steps:
| Steps | Description | |
| 1. | Ensure the artwork is clean. | Tiny particles can show up in the final scan and become a distraction.Gently wiping the surface of your piece with a soft brush or cloth will help prevent unwanted debris. |
| 2. | Select a high-resolution. | Aim for at least 300 DPI (dots per inch) or PPI (pixels per inch).Higher resolutions, like 600 DPI, can be beneficial if you plan on enlarging the image.More pixels capture more detail. |
| 3. | Configure scanner settings. | Use the “Color” setting for artwork with vibrant hues.Only opt for “Grayscale” if your piece is strictly black-and-white. Make any minor adjustments during the preview scan to keep the details accurate. |
| 4. | Align your artwork. | Placing the artwork straight on the scanner bed avoids having to rotate or heavily crop the file later. |
| 5. | Choose the right file format. | To keep your colors and details crisp, use lossless file formats like PNG or TIFF.These formats don’t compress or lose any information, ensuring high-quality prints. |
| 6. | Edit with care. | Small tweaks may be required for lighting, contrast, or removing dust specks.Use image editing software like Adobe Photoshop and refer to any scanning guidelines provided by your printer or POD partner. |
Photographing Your Artwork
Capturing a high-quality scan of a large painting or textured artwork can be difficult. In these cases, photography is a more practical solution.
Modern cameras and even high-end smartphones offer excellent resolution, but getting the right lighting and angles makes all the difference.
Here is how to do it:
| Steps | Description | |
| 1. | Pick the right camera. | A DSLR or mirrorless camera gives the most flexibility, including manual settings.Modern smartphones can also deliver solid results if used with care.Enable RAW or high-resolution settings whenever possible. |
| 2. | Use soft lighting. | Photographing outdoors on an overcast day often yields the best natural lighting.Harsh, direct sunlight can create glare, while bright midday light may wash out the colors. |
| 3. | Stabilize the camera. | A tripod helps eliminate camera shake, which can cause blurriness.Level the camera so it sits perpendicular to the artwork. Double-check that the edges of your piece are parallel to the frame in your viewfinder. |
| 4. | Set up ideal settings. | Select the best camera settings for clear and sharp photos:ISO 100 or 200 helps minimize noise for cleaner images.The aperture around f/8 provides a good balance between depth of field and sharpness.Shutter speed varies based on lighting—use longer exposures in low light to capture more detail. |
| 5. | Shoot multiple angles. | Ensure the artwork is visible, centered, and free of background distractions.Take multiple shots to select the best image later. |
| 6. | Edit and Refine. | Consider calibrating your monitor or using color calibration tools like Datacolor SpyderX Pro to maintain consistent color management. |
Step 2: Prepare Your File for Printing
Capturing a high-quality digital image is just the first step in creating a stunning print.
To ensure that your final product matches the vibrancy and detail of what you see on your screen, proper file preparation is crucial.
Each print-on-demand service or professional printing facility will provide guidelines for file types, sizes, color profiles, and resolutions.
However, to prepare your file for printing, you can follow these steps:
🟢 Scan or upload your artwork at a resolution of at least 300 DPI to ensure sharp, high-definition results.
🟢 Check the size requirements by selecting your desired product and reviewing the specifications listed under the “File Guidelines” section.
🟢 Convert the color mode to CMYK while editing, as this ensures your colors are accurately represented in print.
🟢 Save your final design using the sRGB IEC61966-2.1 color profile to maintain color consistency across different display and printing devices.
🟢 Export your file as a TIFF for the highest print quality, as this format preserves image clarity and transparency where needed.
🟢 Use a mockup or visual preview tool to check positioning, scale, and overall appearance before finalizing your design to avoid costly reprints.
💡 Pro Tip
To make sure your final product reflects the same vibrancy and detail as your on-screen design, Dynamic Mockups’ Advanced Editing Tools help you prepare your designs with precision and ease:
- Experiment with unlimited color combinations, including ready-made palettes from Printful and Printify, to ensure product colors stay true to your original design.
- Bring your vision to life effortlessly with an adjustment feature that lets you adjust colors, contrast, and details for optimal print quality.
- Use smart placement and resizing tools to position your assets perfectly so every element appears just as you intended when printed.
Step 3: Decide on the Printing Material
The choice of material can profoundly impact how viewers experience your art.
Textures, finishes, and overall feel vary significantly between canvases, posters, and metal prints.
Each medium resonates differently with viewers and suits different types of artwork.
Canvas Prints
Canvas prints closely resemble traditional paintings, featuring a textured surface that adds depth and character.
Artists who work with acrylics or oils often prefer canvas because it mimics the feel of their original work.
Additionally, a stretched canvas on a wooden frame provides a professional, gallery-style presentation.
| ✅ Pros | ❌ Cons |
| Mimics traditional paintings with texture. | Fine details may not appear as sharp as on metal prints. |
| Matte finish reduces glare in bright spaces. | Can be damaged by moisture if not properly sealed. |
Paper Posters
Posters are a budget-friendly and flexible option, available in various paper finishes.
They can be framed for a more refined look or mounted directly on walls for a casual display. With a wide range of sizes and designs, they are a popular choice for decorating homes, offices, and dorm rooms.
| ✅ Pros | ❌ Cons |
| An affordable option for high-quality prints. | Prone to creases, tears, and fading over time. |
| It can be framed or mounted for different display styles. | Requires framing for a more premium appearance. |
Metal Prints
Metal prints offer a modern, high-gloss look with exceptional durability.
These prints are infused onto aluminum panels, making them waterproof, fade-resistant, and built to last.
Their vibrant colors and sharp details make them particularly appealing to digital artists and photographers.
| ✅ Pros | ❌ Cons |
| Vivid color reproduction with sharp details. | More expensive than canvas and paper prints. |
| Durable, waterproof, and resistant to scratches and UV light. | A glossy surface can cause glare in bright lighting. |
Step 4: Partner with a Trusted Printing Company
Once you decide on your material, it is time to choose the printing company to work with, as it plays a crucial role in the quality of the final product.
A trusted partner ensures vibrant colors, precise alignment, and consistent results. On the other hand, a poor choice can lead to misaligned prints, color shifts, and disappointed customers.
Since your reputation is directly tied to the quality of your prints, selecting the right printer is essential.
Here is what to look for when choosing your printing partner:
✅ eCommerce integration – Choose a printer that syncs effortlessly with platforms like Etsy, Shopify, or WooCommerce to automate orders and streamline fulfillment, saving time and effort.
✅ Diverse product options – While starting with wall art keeps things simple, a printing service offering various products like tote bags, phone cases, or apparel gives you room to expand later.
✅ High-quality printing technology – Companies that use professional inkjet or giclée printing produce richer colors and sharper details, ensuring a premium look.
✅ Strict quality control – Read customer reviews and order sample prints to guarantee consistency in color, texture, and alignment.
Poor quality prints can lead to refunds and bad reviews, damaging your brand’s credibility.
✅ International shipping & fulfillment – A reliable printing partner should handle international shipping, including customs and duties, helping you reach a global audience.
✅ Transparent pricing – Hidden fees can eat into profits, so work with a printing service that clearly outlines production, shipping, and customization costs.
Always calculate final margins to ensure profitability before listing products.
Step 5: Order Samples for Quality Assurance
Publishing your art for sale without physically checking samples is a gamble.
Physical prints can surprise you with unexpected issues, from slight color inaccuracies to cropping mishaps. Even minor discrepancies become major headaches when a customer notices them first.
Here are 4 key things to keep an eye out for when inspecting your samples:
- Color accuracy – Compare the print colors to your original digital file. Colors may shift due to different printing processes, paper types, or monitor calibration.
- Print quality & detail – Inspect sharpness, resolution, and overall clarity. Fine details may get lost or appear pixelated if the resolution is too low. Check for any unintended blurring or artifacts.
- Material & finish – Feel matters! Is the paper thick enough? Does the canvas have the right texture? Is the frame sturdy? Holding a sample helps you assess the overall quality.
- Packaging and presentation – Buyers often judge an artwork’s value from the moment they unbox it. Checking how your printing partner packages prints can show you if corners might arrive bent or scuffed.
💡 Pro Tip
Before you order your sample, use Dynamic Mockup’s Bulk Creation feature to see how multiple designs look on real-life products.
This feature lets you upload various designs and color options simultaneously, generating hundreds of product variations in seconds.
Beyond providing speed, consistency, and efficiency, it also helps you test different colorways, design placements, and product styles, ensuring your final selection looks exactly how you envisioned before committing to a physical print.
Step 6: Sell Your Art Prints Online
Selling your art prints online can be both simple and rewarding when approached strategically. With the right platform, optimized listings, and effective marketing, you can turn your artwork into a profitable business.
Here is how you can do this:
Choose the Right Selling Platform
Different platforms offer unique benefits, so pick one that aligns with your goals:
- Etsy – A well-known marketplace for handmade and artistic goods. It’s a great starting point due to its built-in audience of art lovers.
- Shopify – Perfect for artists who want full control over their store. It’s highly customizable and integrates well with print-on-demand (POD) services.
- WooCommerce – A flexible WordPress plugin that allows for complete customization, ideal for those who want control over every aspect of their online store.
Optimize Your Product Listings
A well-crafted product listing helps customers make informed decisions and increases your chances of making a sale. Key elements include:
✅ High-quality photos & mockups – Showcase your prints in different settings and angles. Lifestyle mockups help potential buyers visualize your artwork’s appearance in their spaces.
✅ Clear titles – A specific title like “Abstract Giclée Canvas Print – 24×36” is better than just “Abstract Canvas Print” since it helps with search visibility.
✅ Engaging product descriptions – Share what inspired your artwork, describe the printing materials (archival inks, heavy matte paper, etc.), and provide details about packaging and shipping.
✅ Accurate sizing information – List dimensions in both inches and centimeters. Mention if the print is framed or unframed to avoid confusion.
✅ Relevant keywords – Include searchable phrases like “minimalist line art print” or “black-and-white abstract canvas.” This increases your visibility in search results.
Market Your Art Prints
Having beautiful prints isn’t enough. You need to get them in front of potential buyers. Here’s how you can do this:
- Leverage social media – Platforms like Instagram and Pinterest are excellent for showcasing artwork.
Share behind-the-scenes content, time-lapse videos of your creative process, or customer photos of your prints in their homes.
- Build an email list – Send newsletters with updates, new releases, and exclusive discounts. An engaged email list, validated using email verification software, can drive repeat buyers.
- Collaborate with others – Work with influencers, interior designers, or fellow artists to reach new audiences.
- Join Art Communities – Engage in online forums, Facebook groups, or local art collectives to share your work with like-minded buyers.
- Capitalize on Seasonal Promotions – Launch limited-time collections for holidays like Valentine’s Day, Halloween, or Christmas. Seasonal marketing creates urgency and can boost sales.
To Wrap Things Up
Now that you know how to make prints of your art, you’ll be ready to sell them in no time.
The key is ensuring that each print accurately reflects your original work while creating an inspiring piece that customers will love displaying in their homes or workplaces.
To showcase your designs on different products and present them effectively to your audience, creating high-quality mockups is essential.
Dynamic Mockups offers 1,000 free templates, including T-shirts, hoodies, wall art, pillows, tote bags, mugs, phone cases, sweatshirts, and more, to help you visualize your design on real products.
How Can Dynamic Mockups Help You Present Your Art For Online Sail?
Trusted by over 3,000 top brands and platforms like Shopify, Etsy, WooCommerce, and Amazon, this powerful and versatile automated mockup generator is designed specifically for POD and eCommerce businesses.
Here are some of Dynamic Mockups standout features:
✨ Embeddable iFrame Mockup Editor
Easily embed our powerful mockup editor into your website, allowing users to create stunning, professional mockups without ever leaving your platform.
With this feature, you can:
- Design high-quality mockups with ease without compromising print quality.
- Reduce data transfers and minimize printing mistakes for a smoother process.
- Streamline workflows while promoting an eco-friendly approach.
✨ Dynamic Mockups AI Generator
With Dynamic Mockups AI Generator, you can create stunning custom scenes and high-quality backgrounds in just a few clicks.
How it works:
- Enter a description in the Background Prompt, and our AI will generate a perfect backdrop for your product.
- Use the Negative Prompt to remove unwanted elements, ensuring a clean and distraction-free look.
✨ API Functionality
Effortlessly generate stunning Photoshop mockups with our powerful API!
Just upload your designs, and our tool will create high-quality mockups that perfectly align with your brand.
✨ Design Library
Keep all your designs organized in one easy-to-access place! Quickly search, resize, reposition, and edit your designs with just a few clicks.
✨ In addition to these features, Dynamic Mockups seamlessly integrates with eCommerce platforms like Etsy and WooCommerce.
✨ Try Dynamic Mockups free for 7 days and unlock its full power! Before you start, here’s what you need to know:
- A credit card is required to begin your trial.
- You can cancel anytime within 7 days to avoid being charged.
- If you don’t cancel, your subscription will automatically renew based on your selected plan.
Get started with Dynamic Mockups for free and create stunning mockups that make your art truly stand out!
Start creating for Free!
Showcase your E-commerce products like big brands, without costing a fortune
Keep Learning
Affiliate Marketing vs. Print On Demand – Costs, Pros and Cons