Ever wondered how to change the color of a mockup to perfectly match your brand or design? It may seem tricky at first, but it’s actually quite straightforward once you understand the steps. This guide will walk you through everything, from selecting your colors to achieving the perfect final product image. We’ll cover the basics and even some more advanced tricks to help you get the most out of your mockups.
Key Takeaways
- Mockup tools allow you to modify colors and elements.
- You can upload your own images and branding.
- Color adjustment tools make changes easy.
- Advanced options help with dynamic color changes.
- Save your work in the right file format.
Understand Your Mockup Color Customization Options
1. Explore Available Color Options
Once you start working with mockups, you quickly realize there’s a whole world of color possibilities. Some mockups let you change just a few things, like the background color, while others give you control over almost every element.
Think about it: you could change the color of a t-shirt, a phone case, or even the wall behind the product! The key is to understand what parts of the mockup are customizable.
- Basic color changes (background, simple objects)
- Advanced color changes (individual elements, textures)
Pro tip: With Dynamic Mockups, you can customize product mockups—like apparel, packaging, or devices—to any color you want using its intuitive features. Plus, you can generate custom AI background scenes that match your brand palette or campaign aesthetic.
Whether it’s soft neutrals, bold primaries, or seasonal tones, you get full creative control without needing Photoshop skills or a professional designer.
2. Identify Customizable Elements
Not every part of a mockup is up for grabs when it comes to color. Before you get too deep into customizing, take a good look at the mockup’s structure. Some elements might be fixed, while others are designed to be easily changed. Knowing the difference will save you a lot of frustration. Usually, the mockup editor will highlight the parts you can tweak, but it’s always good to double-check.
- Check for editable layers or sections.
- Look for color pickers or palettes linked to specific elements.
- Read the mockup’s description or instructions.
3. Leverage Exact Color Codes
If you’re serious about branding, you likely already have a set of colors and codes (such as hex codes or RGB values) that you use consistently. Using these exact codes in your mockups is crucial for maintaining consistency.
Most mockup editors allow you to enter these codes directly, ensuring you get the exact shade you need. This is especially useful when creating a large number of mockups for a major campaign.
Using exact color codes ensures that your mockups accurately reflect your brand’s visual identity. This consistency builds trust and recognition with your audience.
Here’s a simple example:
| Color Name | Hex Code | RGB Value |
| Brand Blue | #123456 | 18, 52, 86 |
| Brand Green | #789ABC | 120, 154, 188 |
| Brand Yellow | #DEF012 | 222, 240, 18 |
Prepare Your Design Assets
Before you can start swapping colors and making your mockups shine, you’ve gotta get your design ducks in a row. It’s like prepping ingredients before you start cooking – you wouldn’t just throw everything in the pan without a plan, right? Same deal here. Let’s get organized.
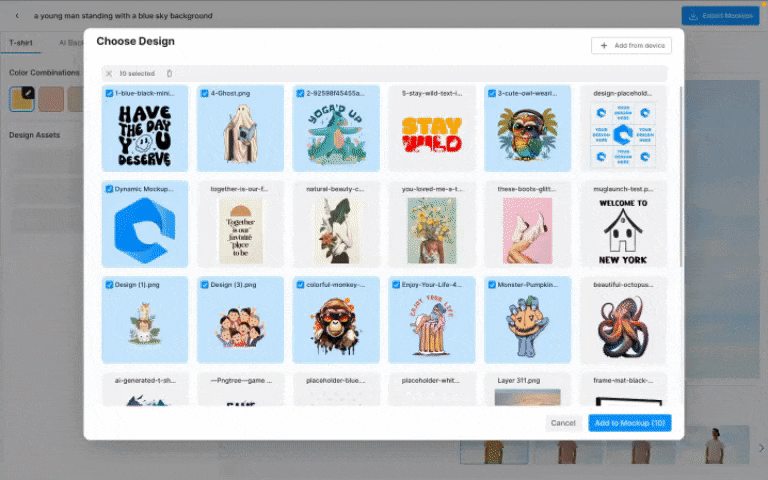
1. Upload Images to the Mockup Editor
First things first, you need to get your images into the mockup editor. Most platforms (such as Dynamic Mockups) make this process fairly straightforward, but there are a few key points to consider. Make sure your images are high-resolution. A blurry logo on a crisp mockup is a bad look.
Also, pay attention to the file formats the editor supports. PNG and JPG are usually safe bets. If you’re working with vector graphics, SVG might be an option for your product mockups.
2. Integrate Branding Elements
This is where you really make the mockup your own. Don’t just slap a logo on there and call it a day. Think about how your branding elements – logos, taglines, patterns – can be integrated in a way that feels natural and cohesive.
Consider the placement, size, and color of your logo. Does it complement the product? Does it stand out too much? It’s all about finding that sweet spot.
Pro tip: With Dynamic Mockups, you can easily upload your branding assets—logos, custom patterns, and brand colors—and apply them directly to a wide range of mockups, setting the placement and size as you wish.
Dynamic Mockups provides flexible positioning and scaling tools, ensuring your branding always appears intentional and polished.
It’s a simple way to keep your visuals consistent and on-brand across every mockup.
3. Manage Multiple Design Assets
If you’re working on a large project with numerous design elements, things can become messy quickly. Here’s where good file management comes in.
- Naming Conventions: Use clear, consistent names for your files. “Logo_Final_Version_V3” is better than “Logo_New.” Trust me.
- Folder Structure: Create a logical folder structure to organize your assets. Separate folders for logos, backgrounds, textures, etc.
- Version Control: If you’re making changes to your designs, keep track of different versions. This can save you a lot of headaches down the road.
Think of your design assets like a well-organized toolbox. When you need a specific tool, you know exactly where to find it. This saves time and reduces frustration, allowing you to focus on the creative aspects of mockup design.
Change the Color of a Mockup Element
Okay, so you’ve got your mockup ready, and now you want to tweak the colors. This is where things get interesting! It’s not just about slapping on a new shade; it’s about ensuring that the color really works with your design. Let’s walk through how to actually change those colors.
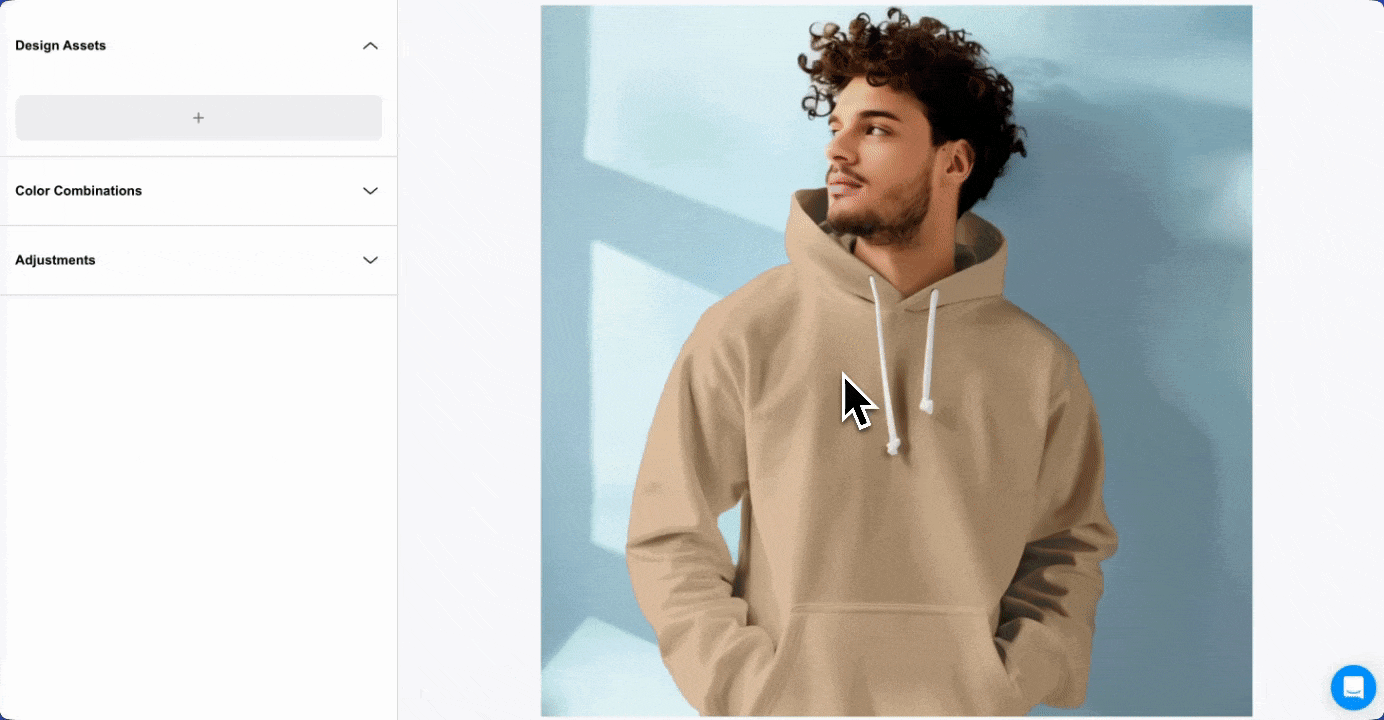
1. Access Color Adjustment Tools
First things first, you need to find the color adjustment tools within your mockup editor. Usually, this involves selecting the specific element you want to change – maybe it’s a t-shirt, a phone case, or even just a background. Once selected, look for options like a color picker, a palette, or even sliders for hue, saturation, and brightness.
The location of these tools can vary depending on the software you’re using, but they’re generally pretty easy to spot. Some programs may have a dedicated “Color” tab or panel, while others may integrate color options directly into the properties of the selected element. Don’t be afraid to click around and explore!
2. Apply New Color Variations
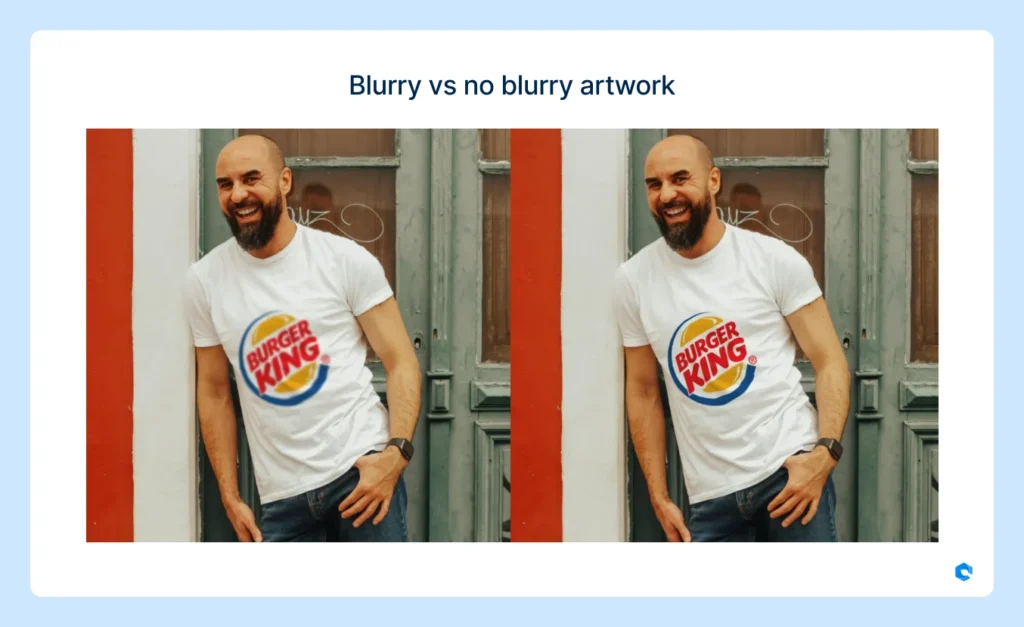
Simply swapping a color can sometimes make the mockup look flat or unnatural, especially if the original image has shadows, textures, or highlights. To achieve a realistic look, professional designers employ layer-based editing with blending modes such as Color, Multiply, or Overlay.
For example, in Photoshop:
- Use the Color blend mode to change hue while keeping light and shadow intact.
- Use Multiply to darken an area while preserving texture.
- Use Overlay to enhance contrast when applying color.
Combine these with layer masks or curves adjustments to fine-tune specific areas. This approach helps maintain the realism of materials like fabric, metal, or plastic – so the final result looks professionally photographed, not just digitally colored.
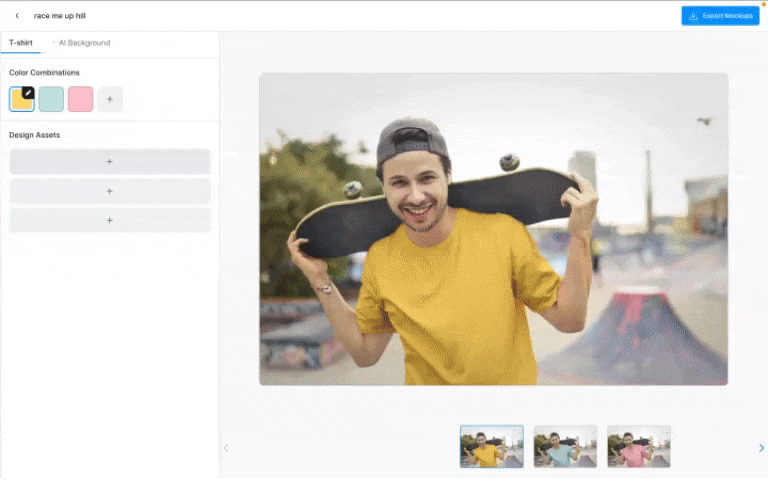
Pro tip: With Dynamic Mockups, you can instantly preview your product in multiple color variations without touching a single Photoshop layer. Just upload your design, choose your base color options, and let the platform auto-generate realistic previews that retain lighting, texture, and shadows—perfect for showcasing colorways in your store or client presentations.
3. Preview Color Swaps in Real-Time
One of the coolest features of most mockup editors is the ability to preview color changes in real-time. This means you can see how a new color looks on your mockup instantly, without having to save or render anything.
This is super helpful for quickly trying out different options and making sure everything looks just right. Pay attention to how the color interacts with other elements in your design, and don’t be afraid to make adjustments until you’re happy with the result. You can preview dynamic product color changes instantly for quick comparison.
It’s a good idea to save different versions of your mockup as you experiment with colors. That way, you can easily go back to a previous version if you don’t like the direction you’re heading. Plus, it gives you a nice collection of options to choose from when you’re ready to finalize your design.
Here are some things to keep in mind when previewing:
- Check the color on different devices (desktop, mobile) to ensure consistency.
- Consider how the color will look in different lighting conditions.
- Get feedback from others to get a fresh perspective.
Advanced Color Customization Techniques
1. Adjust Product Colors Dynamically
Dynamic color adjustment takes your mockups to the next level by allowing colors to change based on user input or other variables. This feature is typically available through interactive mockup tools and APIs – such as Dynamic Mockups API, or custom-coded e-commerce integrations, enabling real-time color updates that significantly enhance user experience and engagement.
2. Create Diverse Color Options
Don’t limit yourself to just one or two color options. Give people choices! The more, the merrier. Think about offering a range of shades, from light pastels to bold, vibrant hues.
Here’s a few ideas:
- Offer pre-set color palettes that complement each other.
- Let users input their own hex codes for ultimate customization.
- Showcase different color combinations to inspire customers.
Having a wide array of color choices can significantly boost customer engagement and satisfaction. It allows them to visualize the product in their preferred style, increasing the likelihood of a purchase.
Pro tip:
With Dynamic Mockups’ embeddable product mockup editor, you can let customers interact with your product mockups directly on your site—changing colors, backgrounds, and designs in real time.
It’s a powerful way to turn static product pages into dynamic, personalized shopping experiences that drive conversions.
3. Ensure Color Consistency Across Campaigns
Color consistency is key for branding. You don’t want your product mockups to look different across various platforms. Imagine your AI plugins in Figma showing one color on your website and another on social media – that’s a branding nightmare!
Make sure you’re using the same color profiles (like sRGB) across all your design assets.
Here’s how to keep things consistent:
- Use a consistent color palette across all mockups.
- Double-check color codes before finalizing designs.
- Consider using color management tools to maintain accuracy.
- Use color converters such as RGB to Pantone to ensure any designs in a different color profile are transformed into the right one.
Optimize Mockup Output
It’s easy to get caught up in the design process, but what happens after you’ve created the perfect mockup? Optimizing your output is key to ensuring your hard work translates into a professional final product. Let’s explore how to make the most of your customized mockups.
1. Save Your Customized Mockup
First things first, always save your work! Most mockup tools offer various saving options. Make sure to save an editable version (like a PSD file) so you can make changes later. This is particularly important if you plan to reuse the mockup for different projects or variations. It’s like having a master copy you can always go back to.
2. Choose the Right File Format
Selecting the correct file format is crucial for different uses. Here’s a quick rundown:
- JPEG (.jpg): Great for general use, especially for web images where file size is a concern. However, JPEGs don’t support transparency.
- PNG (.png): Ideal for mockups with transparent backgrounds. Also good for images with text or graphics where you want to avoid compression artifacts.
- PSD (.psd): This is Adobe Photoshop’s native format. It preserves all layers and editing capabilities, making it perfect for saving your master copy.
Pro tip:
With Dynamic Mockups, you can download your mockups in high-definition quality across multiple formats, including JPG, PNG, WebP, etc., ensuring you’re covered for everything from web uploads to print campaigns.

It’s the fastest way to get crisp, professional results that are ready for any platform.
3. Upload Mockups Directly to Your Store
Many e-commerce platforms now allow you to upload mockups directly to your store. This can save you a ton of time and effort compared to manually creating product images. Look for integrations or plugins that streamline this process. For example, if you’re using a mockup generator API, you might be able to automate the entire process, from mockup creation to product listing.
Streamlining your mockup workflow can significantly reduce the time it takes to get your products to market. By optimizing your output, you ensure that your mockups are not only visually appealing but also practical for your specific needs.
Pro tip: Dynamic Mockups offers direct integration with platforms like WooCommerce and Etsy, making it easy to push your product mockups straight into your store listings.
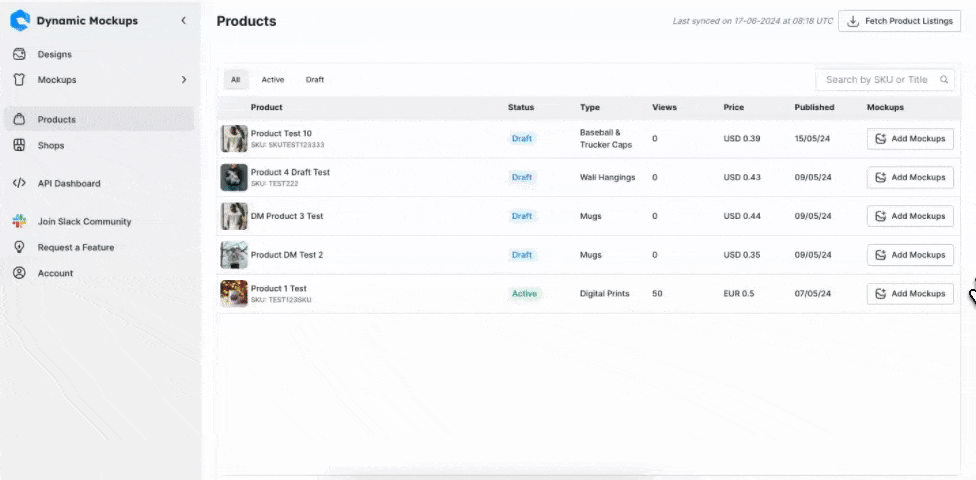
No downloading, renaming, or manual uploads—just design, sync, and start selling faster.
Troubleshoot Common Color Issues
1. Address Color Profile Discrepancies
Okay, so you’ve got your mockup, and the colors are just…off. It happens! One of the most frequent culprits is a mismatch in color profiles. It’s like trying to fit a square peg in a round hole. Your design software might be set to sRGB, but the mockup uses Adobe RGB or even ProPhoto RGB. This can lead to dull, washed-out, or just plain wrong colors.
Here’s a quick checklist:
- Check the color profile of your design file.
- Check the color profile of the mockup file.
- Convert your design file to match the mockup’s profile (or vice versa) if possible.
- Make sure your software’s color settings are consistent.
If you’re still seeing issues after checking the profiles, try assigning a different profile to the image in your editing software. Sometimes, the file’s metadata can be corrupted, leading to incorrect color interpretation.
2. Resolve Transparency Challenges
Transparency can be a common source of mockup frustration. You may upload a logo with a transparent background, only to find it displays with a white box, or renders colors incorrectly against certain elements. This usually happens due to how the mockup tool or editor handles alpha channels, blending modes, and file formats.
Here’s how to troubleshoot like a pro:
- Use proper file formats: Stick to PNG or PSD for assets with transparency. JPEG doesn’t support transparent backgrounds.
- Inspect blending modes: Some tools default to “Normal” mode, which can mishandle transparent areas. Try switching to Multiply, Screen, or Overlay to blend layers naturally.
- Check layer stacking: Ensure transparent assets are placed above solid-color layers, not behind them.
- Use clipping masks: When you need precision, masks help isolate transparency and avoid unwanted background noise.
By addressing these factors directly, you avoid low-quality rendering and maintain the polished, professional look of your mockups.
3. Ensure Accurate Color Representation
Even with the right color profiles and transparency settings, you might still find that the colors on your screen don’t match the final output. This is where monitor calibration comes in. Your monitor’s settings can significantly affect how colors appear. If your monitor isn’t calibrated, you might be making color adjustments based on inaccurate information.
Consider these points:
- Calibrate your monitor using a hardware calibrator for the most accurate results.
- Use a color-managed workflow in your design software.
- Test your mockups on different devices to see how the colors translate.
Here’s a simple table to illustrate the impact of monitor calibration:
| Monitor Condition | Perceived Color Accuracy | Adjustment Needed | Confidence Level |
| Uncalibrated | Low | Significant | Low |
| Partially Calibrated | Medium | Moderate | Medium |
| Fully Calibrated | High | Minimal | High |
Streamline Your Mockup Workflow with the Right Tools
Let’s be real, nobody wants to spend hours manually creating mockups. Automating this process is a game-changer, especially if you’re dealing with a large product catalog or frequent design updates.
Think about using tools that allow you to generate mockups in bulk, saving you a ton of time and effort. This can involve setting up templates and scripts that automatically apply your designs to different product mockups. It’s all about efficiency, right?
Pro tip: Dynamic Mockups’ bulk generator takes this one step further by letting you upload multiple designs at once and automatically apply them across dozens of mockup scenes with different colors. No need to manually adjust each one—just upload, generate, and download your branded mockups in minutes.
It’s a massive time-saver for creators managing lots of product variations or seasonal collections.
Conclusion
Changing the color of your mockups doesn’t have to be a headache. With a few simple steps, you can totally transform your designs and make them look just right.
Whether you’re trying to match a brand’s exact colors or experimenting with different looks, these methods should help you achieve your desired result.
It’s pretty cool how a small color tweak can make such a big difference, isn’t it?
To make the process even easier, Dynamic Mockups lets you customize product colors, explore endless variations, and generate AI-powered background scenes—all in one place.
It’s the fastest way to create professional, brand-ready mockups without the usual design hassle.
Ready to level up your visuals?
Sign up for Dynamic Mockups and start creating stunning mockups in minutes.
Frequently Asked Questions
What kind of color choices do mockups offer?
Some mockups are extremely basic, allowing you to change only the background. Others are more advanced, allowing you to tweak the color of specific items like a phone, a wall, or even clothes.
How do I add my own pictures to a mockup?
You can easily upload your pictures to the mockup editor. Just find the upload button on the left side of the screen.
Can I use my own brand’s colors and logos?
Yes, you can upload your logo or other designs you’ve made. This helps everything look consistent and professional.
How do I change the color of something in my mockup?
It’s super easy! Our tools let you swap colors with just one click. You can see how your design looks in different colors right away.
Can I save my finished mockup?
Yes! Once you’re happy, you can save your mockup as a PNG or JPG file. If you want to keep parts of it see-through, pick PNG.
How does this help me with different color versions?
Our tools are made to help you change product colors easily and create lots of different color options. This saves you time and shows you exactly how your designs will look.