Ever clicked on an online store, only to find images that look blurry or take forever to load?
It’s frustrating, right?
For anyone running an online shop, especially if you’re using a platform like Etsy, Shopify, or any other, getting your product images just right isn’t some minor detail – it’s essential.
This article is all about helping you make your product images shine through ecommerce image optimization, so your store can really take off.
If you want to make your website look great and perform better, you’ve come to the right place.
Key Takeaways
- Good images make people want to buy your stuff.
- Images that load fast keep people on your site.
- The right image size helps your products show up more in searches.
- Different parts of your site need different image sizes.
- Always check how big your image files are so your site stays quick.
1. Image Optimization
Image optimization is the process of reducing the file size of your images without compromising their visual quality.
This improves page loading speed and overall website performance.
Think of it as giving your images a digital diet.
The goal is to make your website faster and more enjoyable for visitors.
It’s not just about shrinking files – it also involves image SEO, which helps your product images show up in Google and other search engines.
Optimized images are super important for e-commerce because customers can’t physically touch the product.
They rely on images, descriptions, and reviews to make a decision. That first impression really matters, so you want your website to look great right away.
This can seriously influence whether someone buys your stuff or not.
Here are some reasons why image optimization is important:
- Faster page load times: Optimized images load quicker, keeping visitors engaged.
- Better user experience: A fast website is a happy website, leading to happier customers.
- Improved SEO: Search engines favor fast-loading websites, boosting your rankings.
- Reduced bandwidth usage: Smaller images mean less data transfer, saving you money on hosting.
There are several strategies to enhance customer experience through image optimization.
For example, you can use tools to resize and compress images before uploading them to your site. Shopify also has built-in features that automatically optimize images for different devices and browsers.
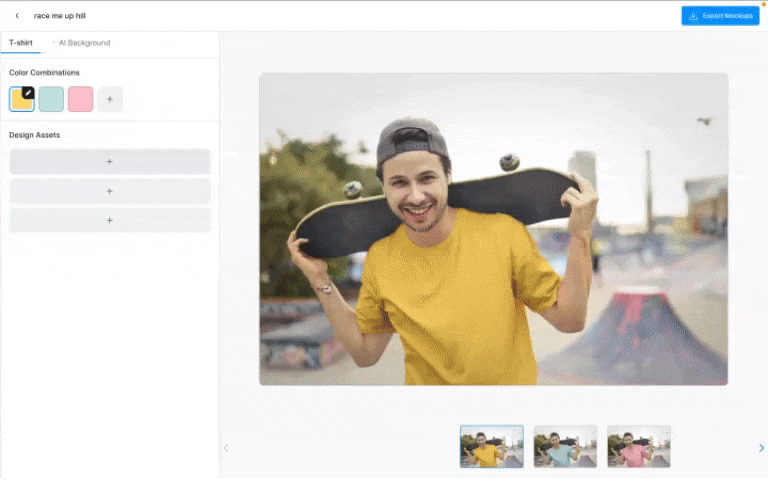
Pro tip: With Dynamic Mockups bulk generator, every mockup you generate is already optimized for web performance—high-quality visuals at minimal file size. You can create stunning, conversion-ready product images at scale without worrying about bloated files slowing down your site.
It’s mockup creation and image optimization rolled into one.
2. Image Dimensions
When it comes to product images, size really does matter. It’s not just about how much space the image takes up on your server, but also how it looks to your customers.
You want images that are clear, crisp, and show off your products in the best possible light. But you also don’t want images so large that they slow down your page load times. It’s a balancing act.
Finding the right dimensions is key to a good user experience.
Too small, and your images will look blurry or pixelated. Too big, and your site will crawl. Let’s break down some common image dimensions and what they’re typically used for:
- Thumbnails: These are small, low-resolution images used for quick previews. Think of them as a teaser for the real deal.
- Medium-sized images: These are your workhorses, perfect for individual product pages where you want to show off different angles and details.
- High-resolution images: These are for those zoomable close-ups, where customers can really inspect the product.
Getting the dimensions right can be a bit of trial and error, but it’s worth the effort. Clear, well-sized images can make a huge difference in how customers perceive your products and your brand.
Recommended Image Sizes
Here’s a quick rundown of some recommended mockup dimensions for different uses:
| Image Type | Recommended Dimensions | Aspect Ratio |
| Thumbnail | 100×200 or 200×200 | 1:2 or 1:1 |
| Product Page | 800×800 to 1000×1000 | 1:1 |
| Zoomable Image | 4096×2048 | 2:1 |
Keep in mind that these are just guidelines. The best dimensions for your images will depend on your specific needs and the layout of your website.
For example, Shopify product images can be quite large, but it’s important to optimize them properly.
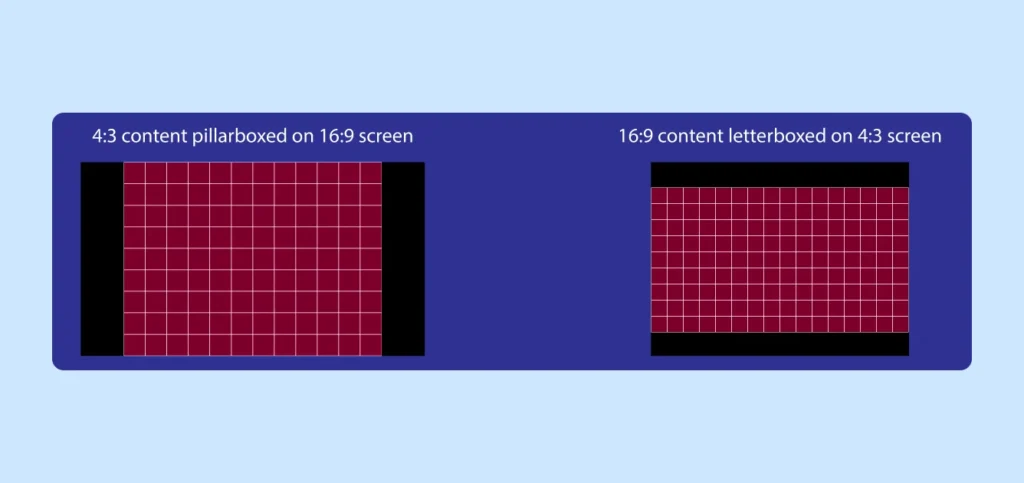
Aspect Ratios
Aspect ratio is the proportional relationship between an image’s width and height. Common aspect ratios include 1:1 (square), 4:3, 3:2, and 16:9. Using the correct aspect ratio ensures that your images display properly without distortion.
For example, if you upload a square image to a space designed for a 4:3 image, it might get stretched or cropped, which can look unprofessional.
Full-Screen Images
If you’re using full-screen images, aim for a pixel width of around 2000 pixels. This should be wide enough to stretch across most browsers without getting cut off or blurry.
Remember to balance image size with file size to avoid slowing down your site. It’s all about finding that sweet spot where your images look great and your site loads quickly.
3. Visual Clarity
When it comes to showcasing your products online, visual clarity is super important. You want customers to see exactly what they’re buying, right? It’s not just about having a pretty picture; it’s about giving them the confidence to click that ‘Add to cart‘ button.
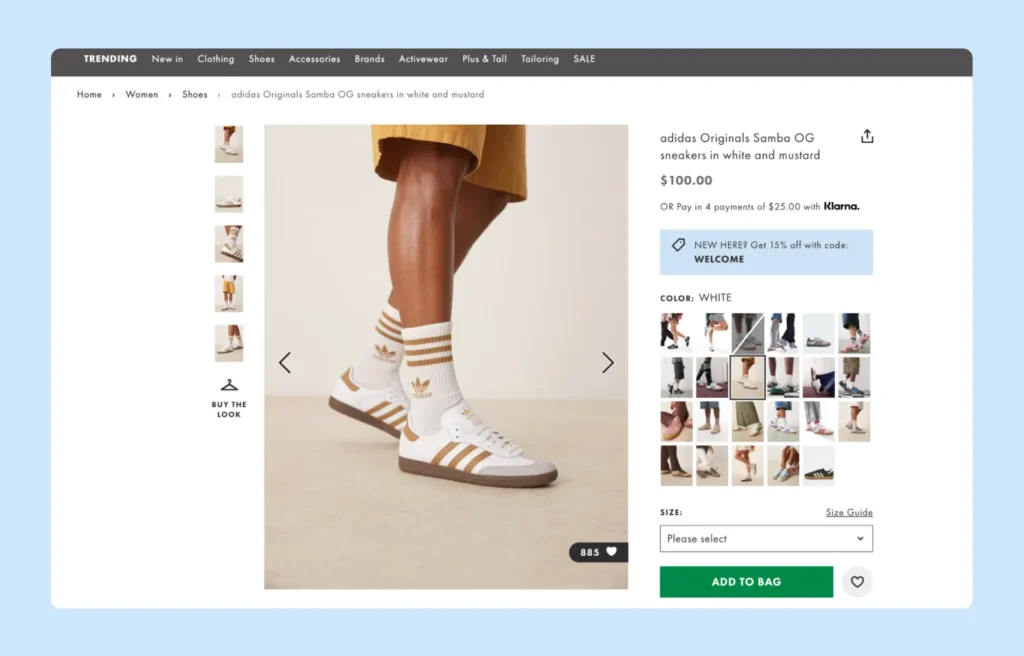
Think of it like this: if a customer can’t clearly see the product, they’re probably going to bounce. Here’s how ASOS does it successfully:
Here are some things to keep in mind:
- Show all angles: Don’t just stick to one photo. Give potential buyers a 360-degree view, or at least show the front, back, and sides.
- Zoom Functionality: Let customers zoom in to see the details. This is especially important for products with intricate designs or textures.
- Color Accuracy: Make sure the colors in your photos are true to life. Nothing’s worse than ordering a blue shirt and getting a purple one.
Make sure your images are sharp, well-lit, and show off the product’s best features.
4. File Sizes
It’s easy to overlook file sizes, but they’re super important for a smooth shopping experience. Large image files can seriously slow down your page load times, which can frustrate customers and even hurt your search engine rankings. Nobody wants to wait forever for a product image to load!
Here’s the thing: you need to strike a balance. You want your images to look great, but you also need them to load quickly. So, how do you do that?
- Keep files under 100KB (if possible) to optimize website performance.
- Use image compression tools (such as TinyPNG).
- Consider using a Content Delivery Network (CDN).
Think of it this way: every image on your site is like a little package being delivered to your customer’s browser. The bigger the package, the longer it takes to arrive. You want those packages to be as small and efficient as possible.
Product photos should ideally be smaller – around 100KB according to best practices. Many platforms, like Shopify, have maximum file size limits (e.g., 20 MB).
5. Image Formats
Choosing the right image format is super important for your e-commerce site. It’s all about finding that sweet spot between image quality and file size. You want your product images to look great, but you also don’t want them to slow down your page load times. Let’s break down some common formats:
1. JPEG (or JPG)
JPEGs are probably the most common format you’ll see. They’re great for photos and images with lots of colors because they offer a good balance between file size and quality. The downside is that they use lossy compression, which means you lose some image quality when the image is compressed. So, if you’re dealing with super detailed images, this might not be the best choice.
2. PNG
PNGs use lossless compression, so you don’t lose any image quality when the file size is reduced. They’re awesome for images that need a transparent background, like logos or graphics. While PNGs can be larger than JPEGs, the quality is usually worth it, especially for detailed graphics. If you need to preserve quality for digital art, PNG is the way to go.
3. GIF
GIFs are known for their ability to support simple animations. They use lossless compression but are limited to a maximum of 256 colors, which results in smaller file sizes. While GIFs have been largely replaced by PNGs for static images, they’re still popular for short, looping animations. Just be aware that for more complex animations, other formats might be better.
4. WebP (Top suggestion)
WebP is an image format developed by Google that provides both lossless and lossy compression. It often reduces file size by a significant amount compared to JPEGs or PNGs, which can really help with website load times. However, not all browsers support WebP yet, so you’ll need to keep that in mind.
5. SVG
SVGs (Scalable Vector Graphics) are vector image formats, which means they use mathematical equations to render the image. This allows SVGs to be scaled to any size without losing quality. They’re ideal for logos, icons, and other graphics that need to be used in multiple locations. Plus, SVGs are typically smaller in file size than other formats.
6. TIFF
TIFF (Tagged Image File Format) is a high-quality, lossless format that’s widely supported by image-editing applications. It’s perfect for storing images for professional printing because of its high resolution and color depth. You can even save multiple images and pages in a single file. The downside? File sizes tend to be large, so use them sparingly on your website.
We provide you with the free tools so you can convert your images into different formats:
7. HEIC
HEIC offers efficient compression while maintaining good image quality. However, not all browsers and devices support HEIC, which can be a problem. It’s usually better to convert HEIC images to more widely supported formats like JPG or PNG.
Choosing the right image format can really impact your site’s performance. Consider what’s most important for each image – quality, file size, transparency – and pick the format that best fits those needs.
6. Product Images
Product images are super important for your online store. They’re not just pretty pictures – they help customers make informed decisions and can seriously impact sales. Think of them as your virtual storefront – you want to make a good impression!
1. Multiple Angles and Colors
Showing your product from different angles is a must. People want to see all sides before they buy. If you sell something that comes in multiple colors, show each one!
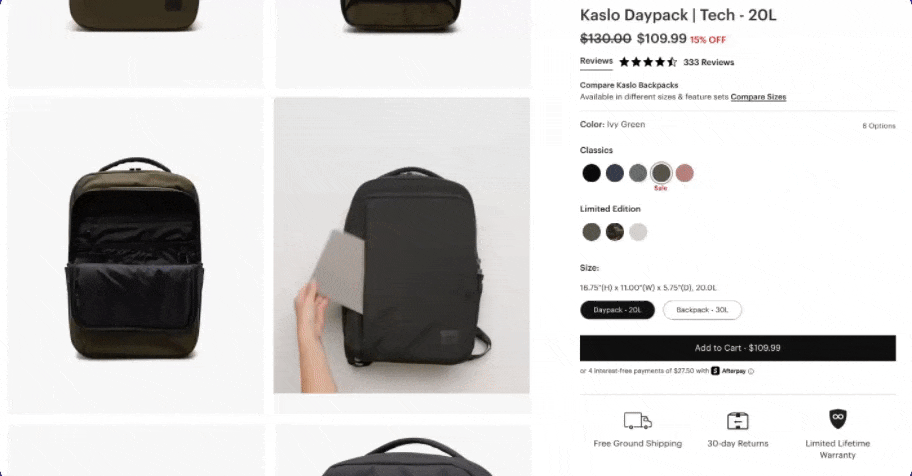
Herschel does this really well; they photograph every single item, even with thousands of SKUs. It gives customers a complete view and builds confidence.
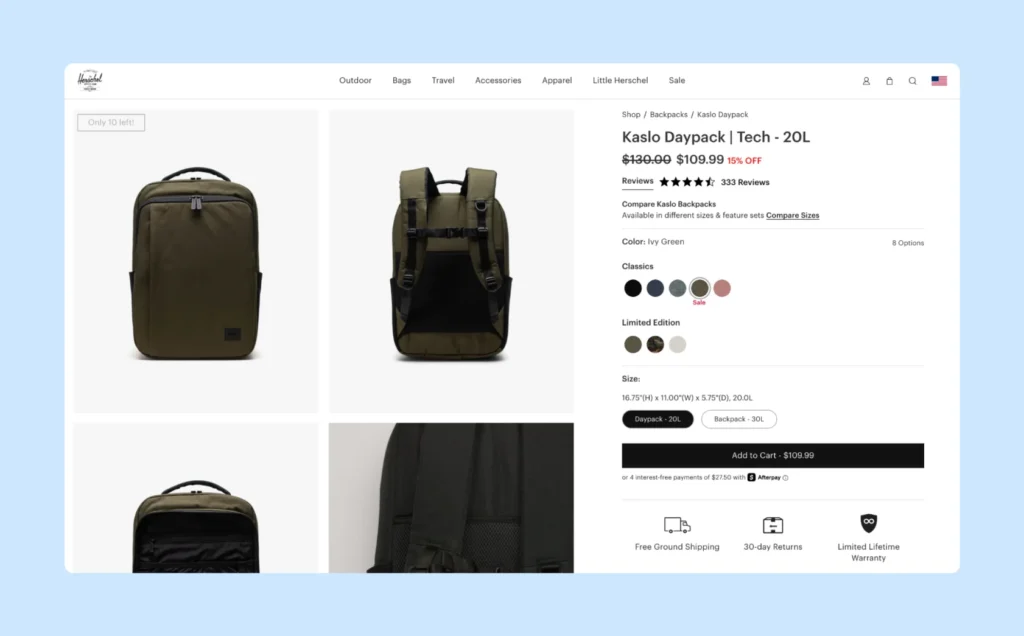
Zoom Functionality
Let customers zoom in! This is huge, especially for products with intricate details or textures. If someone can’t physically touch your product, zooming in is the next best thing. Make sure your images are high-resolution so they don’t get blurry when zoomed.
2. Branding and Consistency
Even though each product image will be different, keep a consistent style. Use the same background, lighting, and maybe even the same model (if applicable). This creates a cohesive look and reinforces your brand identity. It makes your store look professional and trustworthy.
3. Image Types
There are different types of product images you can use to enhance your store:
1. Product-in-use: Show your product in action. This helps customers visualize how it fits into their lives.
2. Slideshow images: Use these to showcase your brand’s personality and highlight collections.
3. Collection images: Group products creatively (e.g., by gender, sale items, etc.) to make it easier for customers to find what they’re looking for.
High-quality images do more than just show off your products; they build trust, provide information, and create a better shopping experience. Don’t skimp on product photography – it’s an investment that pays off.
7. Optimize Images for Better SEO
Okay, so you’ve got your images looking sharp, but are they working for you in search results? Let’s talk Image SEO. It’s not just about pretty pictures; it’s about getting Google to notice them (and your products!).
Think of image SEO as giving Google the context it needs to understand what your images are all about. The better Google understands, the more likely it is to show your images to potential customers.
Here’s the deal:
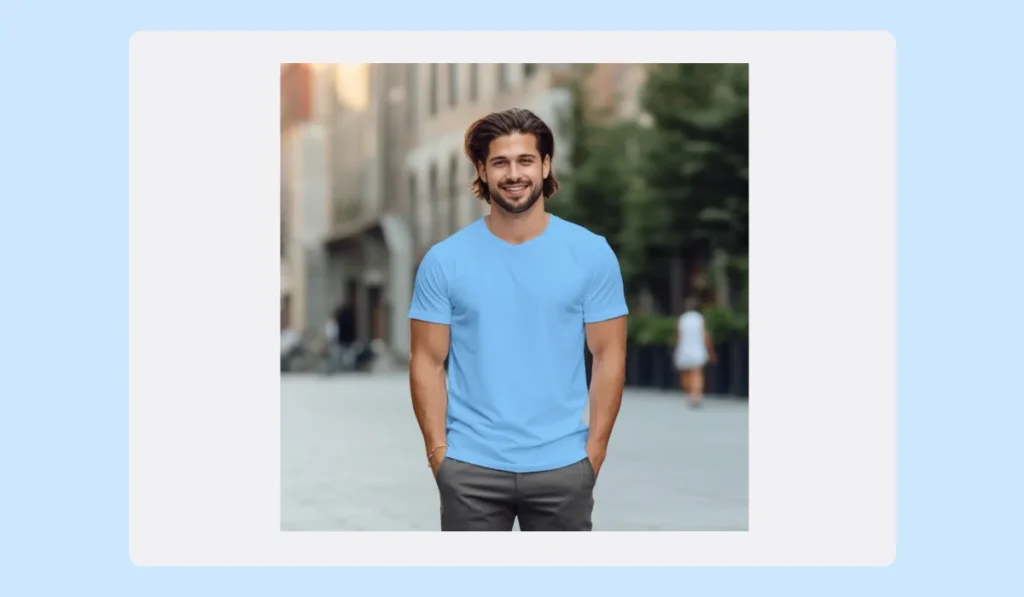
Step 1. Alt Text is Key: This is probably the most important thing. Use descriptive alt text for every image. Instead of “image1.jpg,” try “Blue cotton t-shirt on a model.” Be specific!
Step 2. File Names Matter: Before you even upload an image, give it a descriptive file name. “blue-cotton-t-shirt.jpg” is way better than “DSC001.jpg.“
Step 3. Image Sitemap: Create an image sitemap to help search engines discover your images. This is especially useful if your images are loaded with JavaScript.
Step 4. Optimize for Speed: Faster loading pages rank higher. Compress your images without sacrificing too much quality. Use tools to reduce file size, such as TinyPNG.
Basically, you want to make it as easy as possible for Google to understand and index your images. This will help you get more organic traffic to your product pages and, ultimately, more sales.
8. Improve Page Loading Time
Website speed is super important, especially when it comes to keeping people on your ecommerce site. Images are often the biggest culprit when it comes to slow loading times. If your pages take too long to load, people will just leave, and you’ll lose potential sales. It’s that simple.
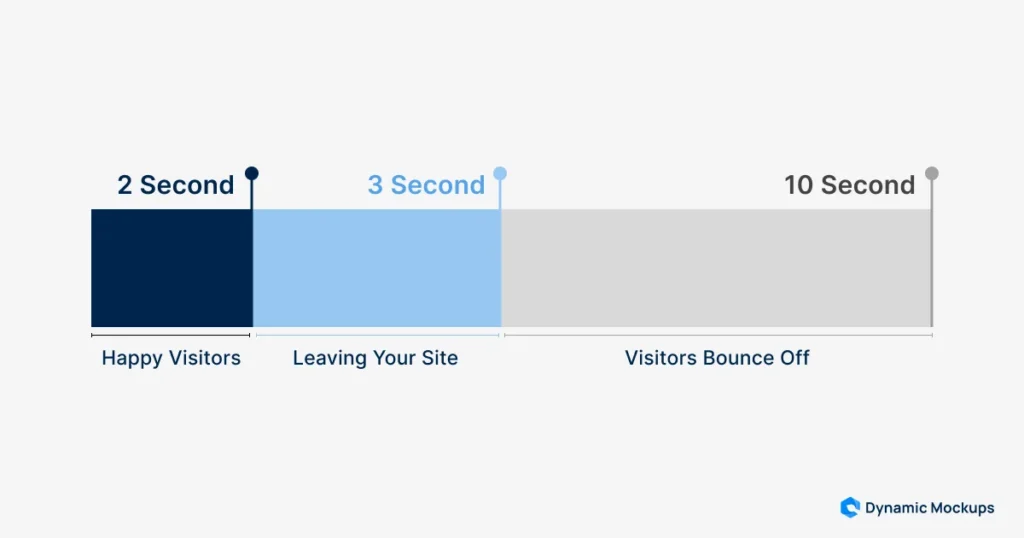
Think of it like this: every second counts. A delay of even a few seconds can significantly impact your bounce rate and conversion rates.
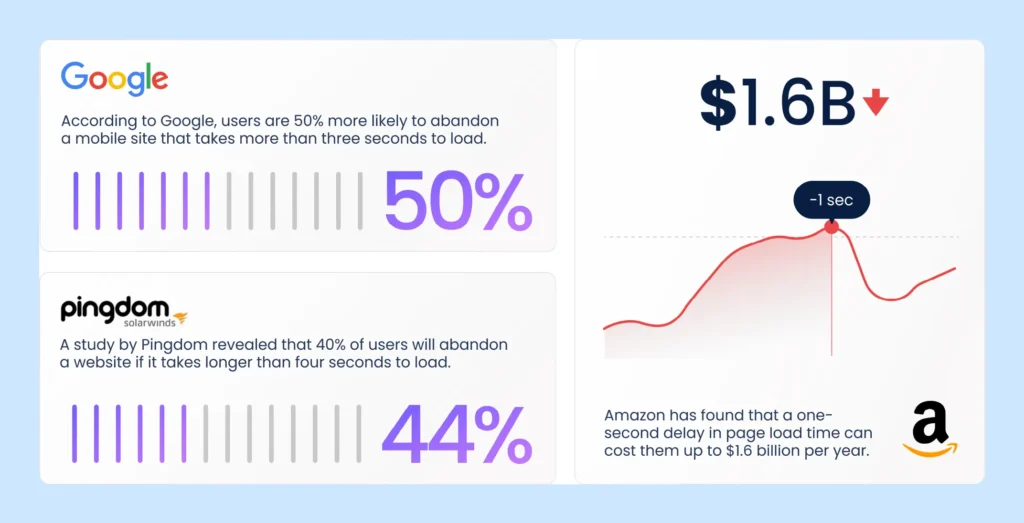
The golden 2-second rule from Google says that websites should load in 2 seconds or less. If it takes longer, your visitors will probably bounce, leading to lower conversions.
Here’s why page load times matter:
- Customer Experience: No one likes waiting for a page to load. A fast site keeps visitors happy and engaged.
- SEO: Search engines like Google consider page speed when ranking websites. Faster sites tend to rank higher.
- Conversion Rates: Faster loading times often lead to higher conversion rates. People are more likely to buy if they don’t have to wait.
To prevent this, ensure your images are optimized so they don’t slow down your site.
BONUS: Make Lifestyle Product Images
Lifestyle images are more than just pretty pictures; they’re a way to connect with your audience on a deeper level. They tell a story and create a desire that a simple product shot just can’t match.
They’re all about showing your product in action, in a way that customers can relate to. Think of it as turning your product into something people want to have in their lives.
These images help shoppers picture themselves using your stuff every day, or living the kind of life they dream about. It’s not just about what you’re selling; it’s about the lifestyle it represents.
Here are a few things to keep in mind:
- Authenticity is key: Make sure the images feel real and not overly staged.
- Showcase the benefits: Highlight how the product fits into a person’s daily routine.
- Target your audience: Tailor the images to appeal to your ideal customer.
Pro tip:
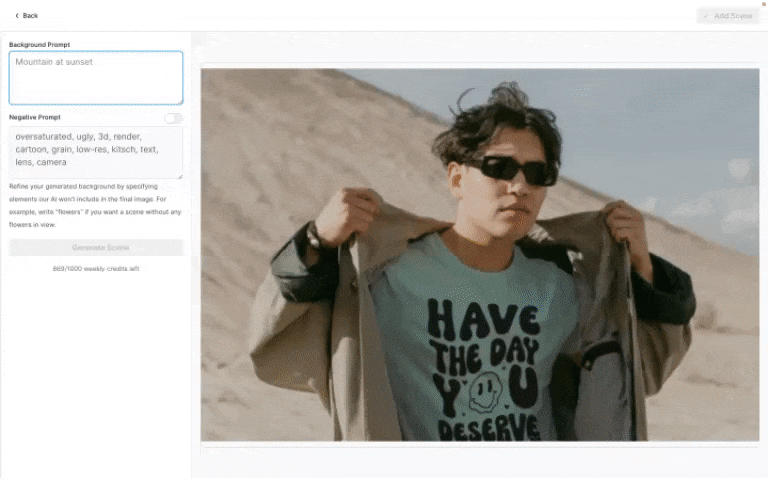
You can use Dynamic Mockups AI mockup generator to quickly generate high-quality lifestyle product mockups without needing a studio or professional photographer.
Simply upload your product artworks, prompt a mockup background scene, and let the tool create photo-realistic visuals that bring your brand to life.
Using lifestyle images is a great way to enhance your lifestyle photography and showcase your products in a way that truly resonates with people.
Wrapping Things Up
We’ve discussed image sizes and their importance for your online store extensively. It’s not just about making things look good, though that’s a big part of it.
Getting your images just right means your site loads faster, people stick around longer, and they’re more likely to buy something.
Think about it: if a picture is blurry or takes forever to load, you’re probably going to click away, right?
It’s all about making that first impression count and keeping your customers engaged.
Ready to elevate your product visuals?
Sign up and try Dynamic Mockups to instantly create sharp, optimized, and lifestyle-ready product images that boost engagement and conversions, without the need for complex editing or photography setups.
Frequently Asked Questions
What does ‘image optimization’ mean?
Image optimization is about making your pictures smaller in file size without losing their good looks. This helps your website load faster, which is great for visitors and also helps your images show up better in search engines like Google.
Should I make my images blurry to save space?
You shouldn’t sacrifice how clear or detailed your images are just to make their file size smaller. Customers won’t feel confident buying something if the pictures look bad. Good-looking images make people more likely to buy. The trick is to find a balance between clear pictures and small file sizes, which image optimization helps with.
What’s the best image size for online stores?
The best size for images on e-commerce sites is often around 640 x 640 or 800 x 800 pixels. However, it’s more important that your images are clear and load quickly, no matter the exact size.
Do image sizes really matter for selling products online?
Yes! When people shop online, they can’t touch the product, so pictures are super important. Good, clear images make a strong first impression and help customers understand what they’re buying, making them more likely to purchase.
Why are high-quality images important?
High-quality images make your website look professional and trustworthy. They also allow customers to zoom in and see details. Keeping all your product images the same shape, like squares, helps your website look neat and makes it easier for people to browse on their phones.
What are the upload limits for images on Shopify?
You can upload images up to 5000 x 5000 pixels, and they can be as large as 20 MB. For square product images, a size of 2048 x 2048 pixels is usually recommended.